Illustration Grid system

The Illustration grid system can be an annoying process at times if you are unable to find and navigate correctly, the measurements will definealy save alot of time when you are layering a structure properly. So to resolve this problem, I am showing a little useful technique in which you can plan the structure of your work using simple square vectors.

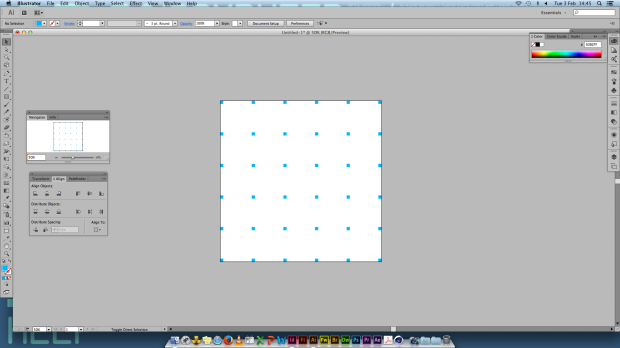
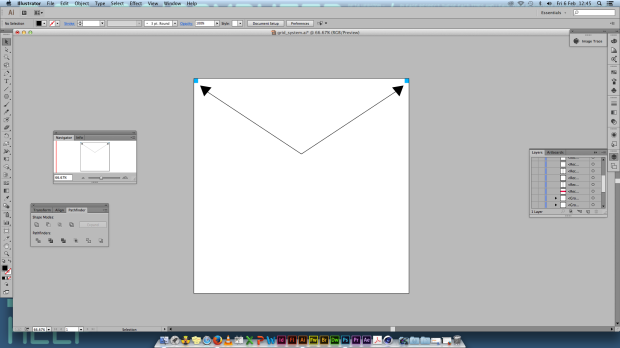
First you need to open up Illustrator, and start off by creating a simple square vector and round-up the measurement to say 20cm by 20cm (or a measurement of your choice), and then decide how many columns and row you want, and start by duplicating the shape and place each one in the corner of your ‘Artboard‘ as followed below.

Screen Shot 2015-02-06 at 12.45.57

Once you have done this, make your way to ‘Windows‘ on top and select on ‘Pathfinder‘ and it will bring up a small panel of three options. We’ll be working with the ‘Aligh’ to make sure that the sqaure vectors are aligned with each other and are evenly distrubted across the ‘Artboard’.

Screen Shot 2015-02-03 at 14.45.23

To make things alot easier, we group together the squares across and then duplicate them below until they have filled up the ‘Artboard‘, now you’ll notice that they are not distrubted evenly, and to solve this we use the ‘Alignment‘ option.

Now we can start to structure a layout format for anything!
This slideshow requires JavaScript.

Illustrator: Character Creation

The illustrative character which I have based my trace-over on, is an old notorious gangster, Al Capone whose reputation of gaining power, through illegal bootlegging spread fear throughout the streets of Brooklyn. To start off with, I searched the Internet collecting images for a suitable reference and decided to go with a classic black suit and red tie. This character creation, is the first stage of my brief given, the aim is to eventually import the finished piece into Aftereffects for a loop animation.


Textured

Textured

Illustrator: Finished Trace-over

I have finished completing my trace over of the Iconic celebrity, Marilyn Monroe . I have really enjoyed learning the basic fundamentals of Illustrator and the techniques showed within Steve Calcutt’s tutorial will be of vital importance within the near future.

                                                                    Eye Progression
I started out with the simple Eye outline trace over, however I was told to not enclosed the oval shape as we were trying for a comical effect on Marilyn Monroe. As I progressed onto the refinement detail such as the eyelashes, I used the “Pen Tool” to create a single line which was “Curved” and then copied multiple times and adjusted the lengths accordingly. I had to place White highlight of the eye below the outline so that it will save time rather than fiddling with the vector points to accurately be placed on the outline.

                                                                      Mouth Progression
I struggled on drawing the mouth and had several attempts before succeeding, by using the same layering technique as the eye. Tracing over the teeth was rather difficult, I had to lower “Opacity” down to 50% for visibility on the Mouth Outline for a clear trace over. Once that was completed, I added the refinement details such as highlights and black area of Marilyn mouth.

Progression from start to Finish

Illustrator: Trace-over

This Monday’s session, we are continuing our work on tracing over Marilyn Monroe. Since I have already finished the basic outline trace-over, the main focus of todays session will be on how to create her eyes. At first, I struggled with the eye outline because normally I would enclose the Vector, making the eye a complete oval. I was told to leave a small gap, and used the previous technique I learnt last week by going onto Object/Path/Simplify, to smooth out the curved vector.

Screen Shot 2014-03-03 at 14.56.20

Illustrator: Introduction

Illustrator tutorial of understanding vector

After a wonderful Christmas break, I was looking forward to Steve’s tutorial on using Illustrator. I have used this program several times before for fun and experimenting with my scanned in photographs and drawings. However I wanted to gain an in-depth knowledge of the program, so that I am able to make use of this software for future projects.

I was given an image Marilyn Monroe, to trace around different parts of her body and divide them into sectors, such as the hair and neck using the “Pen Tool”. I learnt that vectors were strokes or a line with points that can be easily altered using the “Curve Tool”. When I finished the trace over of my image, I found that I created too many points, which made it complicated and hard to adjust. However instead of deleting each point and re-adjusting, Steve showed a way of resolving this issue by going onto “Object/Path/Simplify”, this reduces the points and makes the strokes smoother.

marilynILL

For our next tutorial we will be completing our image, by focusing on Marilyn’s facial features such as the eyes/mouth/ears, something that I am really looking forward too.